aj-fernandez.github.io

- Create my own reference guide for mobility
- Learn ***
Installing ELK stack on Hewlett Packard ML350 G5 (thanks SAFA for the hardware)

Update and install required packages
sudo apt update && apt-get -y upgrade
sudo apt install apt-transport-https software-properties-common wget
Install jdk oracle java (required by Elastichsearch & Kibana)
sudo apt install openjdk-8-jdk

wget -qO - https://artifacts.elastic.co/GPG-KEY-elasticsearch | sudo apt-key add -
echo "deb https://artifacts.elastic.co/packages/6.x/apt stable main" | sudo tee -a /etc/apt/sources.list.d/elastic-6.x.list

sudo apt update
sudo apt install elasticsearch
Limiting listen interfaces for Elasticsearch
Edit /etc/elasticsearch/elasticsearch.yml
network.host: localhost (localhost can be changed for an IP)
Restart Elasticsearch for load changes and enable for load at new boots
systemctl restart elasticsearch
systemctl enable elasticsearch
Checking the installation of Elasticsearch, this must show a JSON doc
curl -X GET http://localhost:9200
Install plugin required for Apache2 and Nginx modules among others:
On: /usr/share/elasticsearch
bin/elasticsearch-plugin install ingest-user-agent
bin/elasticsearch-plugin install ingest-geoip
Installing Kibana
apt install kibana
Restricting remote access to Kibana
Edit /etc/kibana/kibana.yml
server.host: "localhost"
Restart Kibana for load changes and enable for load at new boots
systemctl restart kibana
systemctl enable kibana
Usin Nginx like reverse proxy to access Kibana from public IP
-
Intall Nginx web server
apt install nginx -
Basic authentication file with openssl command
echo "admin:$(openssl passwd -apr1 typeHereThePassword)" | sudo tee -a /etc/nginx/htpasswd.kibana
This is a virtual host config file, delete the default file and create /etc/nginx/sites-available/kibana:
	server {
	    listen 80 default_server;
	    server_name _;
	    return 301 https://$server_name$request_uri;
	}

	server {
	    listen 443 default_server ssl http2;

	    server_name _;

	    ssl_certificate /etc/ssl/certs/ssl-cert-snakeoil.pem;
	    ssl_certificate_key /etc/ssl/private/ssl-cert-snakeoil.key;
	    ssl_session_cache shared:SSL:10m;

	    auth_basic "Restricted Access";
	    auth_basic_user_file /etc/nginx/htpasswd.kibana;

	    location / {
	        proxy_pass http://localhost:5601;
	        proxy_http_version 1.1;
	        proxy_set_header Upgrade $http_upgrade;
	        proxy_set_header Connection 'upgrade';
	        proxy_set_header Host $host;
	        proxy_cache_bypass $http_upgrade;
	    }
	}
Activate this site creating the simbolic link, test it and restart&enable:
	sudo ln -s /etc/nginx/sites-available/kibana /etc/nginx/sites-enabled/kibana
	sudo nginx -t
	sudo systemctl restart nginx
	sudo systemctl enable nginx
Install Logstash, restart&enable
sudo systemctl restart logstash
sudo systemctl enable logstash

Config file used by default: /etc/logstash/startup.options
Validating Logstash setup
sudo -u logstash /usr/share/logstash/bin/logstash --path.settings /etc/logstash -t
Install Filebeat on forwarders-nodes
Home path: [/usr/share/filebeat] Config path: [/etc/filebeat] Data path: [/var/lib/filebeat] Logs path: [/var/log/filebeat]
curl -L -O https://artifacts.elastic.co/downloads/beats/filebeat/filebeat-6.5.2-amd64.deb

sudo dpkg -i filebeat-6.5.2-amd64.deb

systemctl status filebeat

systemctl enable filebeat
-
Config host.elastichsearch in /etc/filebeat/filebeat.yml:
output.elasticsearch: hosts: ["myEShost:9200"] -
Add credentials if elasctichsearch or kibana have been secured:
  output.elasticsearch:
    hosts: ["myEShost:9200"]
    username: "filebeat_internal"
    password: "typePassword"

  setup.kibana:
    host: "mykibanahost:5601"
    username: "myKibanaUser"
    password: "typePassword"
Filebeat config official guide
Enable modules that you want to run
-
Enable them:
filebeat modules enable system nginx mysql apache2 etc -
To see a list of enabled and disabled modules:
filebeat modules list
Config modules: /etc/filebeat/modules.d/system.yml
Set up initial environment.
-
Run:
filebeat setup -e
The setup command loads the recommended index template for writing to Elasticsearch and deploys the sample dashboards (if available) for visualizing the data in Kibana. This is a one-time setup step.
The -e flag is optional and sends output to standard error instead of syslog.
After than, doing curl localhost:9200/_cat/indices or viewing at browser should be a index name, this name must be put on the index patter of kibana site to collect them.
Start filebeat for push the logs or configured resources.
-
Run:
service filebeat start
For verify that Elasticsearch is receiving this data:
-
Run:
curl -XGET 'http://localhost:9200/filebeat-*/_search?pretty'
And the output of curl should show something like this, the json docs created for each event generated by our monitorized logs.
 "@timestamp" : "2018-11-26T10:58:05.000Z",
      "system" : {
        "syslog" : {
          "hostname" : "debianbackup",
          "program" : "kernel",
          "message" : "[1037924.891748] [UFW BLOCK] IN=enp3s0 OUT= MAC=01:00:5e:00:00:fb:b8:53:ac:9e:b5:f6:08:00 SRC=10.65.3.141 DST=224.0.0.251 LEN=32 TOS=0x00 PREC=0x00 TTL=1 ID=50427 PROTO=2 ",
          "timestamp" : "Nov 26 10:58:05"
        }
      },
      "beat" : {
        "hostname" : "debianbackup",
        "name" : "debianbackup",
        "version" : "6.5.2"
      },
      "host" : {
        "os" : {
          "codename" : "stretch",
          "family" : "debian",
          "version" : "9 (stretch)",
          "platform" : "debian"
        },
        "containerized" : false,
        "name" : "debianbackup",
        "id" : "05708074cb5b49a3a1e5624260d5f072",
        "architecture" : "x86_64"
      }
    }
  },
  {
    "_index" : "filebeat-6.5.2-2018.12.08",
    "_type" : "doc",
    "_id" : "kl7Hj2cB3NM3oblOBygf",
    "_score" : 1.0,
    "_source" : {
      "offset" : 527409,
      "prospector" : {
        "type" : "log"
      },
      "source" : "/var/log/syslog",
      "fileset" : {
        "module" : "system",
        "name" : "syslog"
      },
      "input" : {
        "type" : "log"
      },
It is so interesting and, above all, useful, that we can interact with Elasticshearch using a RESTFul API. Thanks to this we can, using a browser, a programming language or like in the previous section, using curl on a shell, interact with Elasticsearch over the port 9200 in an easy way.
On the project website we can find what is necessary to develop our queries using curl.
Extra, fixing “vm.max_map_count error”:
bootstrap checks failed
initial heap size [268435456] not equal to maximum heap size [2147483648]; this can cause resize pauses and prevents mlockall from locking the entire heap
max virtual memory areas vm.max_map_count [65530] likely too low, increase to at least [262144]
Do (/etc/sysctl.conf):
sysctl -w vm.max_map_count=262144
Rsync over SSH
Synchronize local folder on remote server:
rsyn -r -a -v -e ssh /localFolder sshUser@server:/targetPath

rsync -r -a -v -e ssh  /localFolder sshUser@jupiter.ajfernandez.me:/targetPath

	If ssh options needed, like port:

		rsyn -r -a -v -e "ssh -p portNum" /localFolder sshUser@server:/targetPath
Synchronize folder from the remote server on the local server:
rsync -r -a -v -e ssh sshUser@server:/sourceFolder /pathTo/localFolder
LDAP uiDnumber
ldapsearch -h 192.168.2.200 -p 389 -D "cn=admin,dc=2cfs-w,dc=com" -w Admin1234 -b "dc=2cfs-w,dc=com" "(&(sn=jensen)(l=Cupertino))"
allUsersLdap
ldapsearch -h 192.168.2.200 -p 389 -D "cn=admin,dc=2cfs-w,dc=com" -w Admin1234 -b "dc=2cfs-w,dc=com" "(&(uidNumber=*)(gidNumber=10000))"
allUserLDAP and grep to only show uidNumber
ldapsearch -h 192.168.2.200 -p 389 -D "cn=admin,dc=2cfs-w,dc=com" -w Admin1234 -b "dc=2cfs-w,dc=com" "(&(uidNumber=*)(gidNumber=10000))" | grep uidNumber
Flag -LLL exclude the output comment of “ldapsearch” from the output to stdout (display or file)
Now allUsersLDAP without comment and ORDERED with sort -k2 :)
ldapsearch -LLL -h 192.168.2.200 -p 389 -D "cn=admin,dc=2cfs- w,dc=com" -w Admin1234 -b "dc=2cfs-w,dc=com" "(&(uidNumber=*)(gidNumber=10000))" | grep uidNumber | sort -k2
All uidNumbers used by ldap users orderen without more stuffs
ldapsearch -LLL -h 192.168.2.200 -p 389 -D "cn=admin,dc=2cfs-w,dc=com" -w Admin1234 -b "dc=2cfs-w,dc=com" "(&(uidNumber=*)(gidNumber=10000))" | grep uidNumber | sort -k2 | cut -d: -f2
All previous results and returning only the last line that matched with the higher uidNumber, so now i must set this command to a variable and sum 1 to set the new uidNumber for the user that im addind to LDAP
ldapsearch -LLL -h 192.168.2.200 -p 389 -D "cn=admin,dc=2cfs-w,dc=com" -w Admin1234 -b "dc=2cfs-w,dc=com" "(&(uidNumber=*)(gidNumber=10000))" | grep uidNumber | sort -k2 | cut -d: -f2 | tail -1
rSyslog
sudo apt install rsyslog
Now edit Rsyslog configuration file and configure the location’s to generate log files in system.
vim /etc/rsyslog.conf
And add following lines as the end of file.
$template TmplAuth, "/var/log/%HOSTNAME%/%PROGRAMNAME%.log"

authpriv.*   ?TmplAuth
*.info,mail.none,authpriv.none,cron.none   ?TmplMsg
Also remove comment from following lines ( remove starting # ) in rsyslog configuration file to enable UDP.
$ModLoad imudp
$UDPServerRun 514
If you are using iptables to protect your system, then you need to add following rule to open port
iptables -A INPUT -m state --state NEW -m udp -p udp --dport 514 -j ACCEPT
After making above changes in Rsyslog central server, restart service using following command.
service rsyslog restart
[or]
systemctl restart rsyslog
After configuring Rsyslog centralized server, lets configure clients system to send there logs to central Rsyslog server. Login to each client nodes and add following line at end of the file
vim /etc/rsyslog.conf
Add below line, change hostname or ip with your central Rsyslog systems ip/hostname.
*.*   @192.168.1.254:514
[or]
*.*   @logserver.example.com:514
Restart rsyslog service using following command.
service rsyslog restart
SELinux add
semanage -a -t syslogd_port_t -p udp 514
MySQL
vim /etc/rsyslog.conf
And add following entries in configuration file.
$ModLoad ommysql
*.* :ommysql:127.0.0.1,Syslog,rsyslog,MYSQLPASSWORD
After adding above lines and restart Rsyslog service.
service rsyslog restart
[or]
systemctl restart rsyslog
MYSQL script creación
mysql -u root -p < /usr/share/doc/rsyslog-mysql-4.8.10/createDB.sql
Above command will create an database with name Syslog in MySQL. Now we need to create MySQL user for accessing database.
# mysql -u root -p
mysql> GRANT ALL ON Syslog.* TO 'rsyslog'@'localhost' IDENTIFIED BY 'MYSQLPASSWORD';
mysql> FLUSH PRIVILEGES;
mysql> exit
SCREEN cheatsheet
$ screen -S nombreDeLaSesion
OPCIONES
-S sockname     Da nombre a la sesión [pid].sockName.
-ls             Lista las sesiones abiertas de screen.
-r              Reattach a un sesión. Es posible especificar el nombre
-t título       Permite dar un título a una ventana
DENTRO DE UNA SESION DE SCREEN
Ctrl-a ?          Ayuda de Screen
Ctrl-a c          Crear una nueva ventana virtual.
Ctrl-a ”          Lista navegable de ventanas abiertas
Ctrl-a Ctrl-n     Cambiar a la venana Siguiente o Anterior
Ctrl-a Ctrl-N     Cambiar a la Ventana N (de 0-9)
Ctrl-a x          Bloquear todas las terminales con una clave
Ctrl-a d          Hacer un Detach. Sales de la ventana pero la deja activa.
exit              Con esto cierras la ventana virtual de definitivamente.
Ctrl-a S          Divide la ventana horizontalmente
Ctrl-a tab        Salta a la siguiente zona
Ctrl-a X          Cerrar la zona actual
Ctrl-a Q          Cerrar todas las zonas excepto la actual

Ctrl-a S          Divide horizontalmente
Ctrl-a tab        Salta a la siguiente zona
Ctrl-a X          Cerrar la zona actual
Ctrl-a Q          Cerrar todas las zonas excepto la actual

Ctrl-a d          Dettach. Sale de la sesión pero la deja en segundo plano
              junto a todas sus ventanas.
exit              Cierra la ventana actual. Cerrando todas las ventanas
              se cierra la sesión de screen.
Copiar en Screen
Ctrl-a + [      Entrar en modo copia/scroll.
Enter           Comenzar la selección de texto / Finalizar la selección
            de texto, copiar y salir modo copia/scroll.
Cursor          Desplazamiento del cursor selecciona el texto a
            copiar (si estamos en modo copia/scroll).
ESC             Salir del modo copia/scroll sin copiar nada.
Ctrl-a + ]      Pegar el texto copiado.
##myRegex quickReference
Pattern Reference

Pattern 	Description
[abc]		A single character: a, b or c
[^abc]		Any single character but a, b, or c
[a-z]		Any single character in the range a-z
[a-zA-Z]	Any single character in the range a-z or A-Z
^		Start of line
$		End of line
\A		Start of string
\z		End of string
.		Any single character
\s		Any whitespace character
\S		Any non-whitespace character
\d		Any digit
\D		Any non-digit
\w		Any word character (letter, number, underscore)
\W		Any non-word character
\b		Any word boundary character
(...)		Capture everything enclosed
(a|b)		a or b
a?		Zero or one of a
a*		Zero or more of a
a+		One or more of a
a{3}		Exactly 3 of a
a{3,}		3 or more of a
a{3,6}		Between 3 and 6 of a
On-line trainning in regEx
https://regexr.com/3g5j0
Lsof family
lsof -i :<port> -> -i of Internet

 	lsof -i :80 -> It will show the output of 80 port in that case.

lsof -c -> -c of command

	lsof -c apache2 -> Open files by apache
What process openes a specific file?
lsof /path/to/file
Which files are opened in a directory?
lsof +D /path/to/dir
Which files are open by a specific user?
lsof -u userName
Which files are open by a given process?
lsof -p PID
Docker tarea2
sudo docker commit --change='CMD ["wordpressScript"]' d8d8e74fef3e tarea2_e2_v4 -> its correct too use the full path /usr/sbin/wordpressScript

sudo docker run -d  -p 8080:80 --name wordpress tarea2_e2_v4

sudo docker save -o tarea2_e2_v4.tar tarea2_e2_v4 -> save a copy of this image in a .tar file

dettach /\ attach

Dettach ->  in the container's interpreter to dettach without close it -> CTRL P + CTRL Q (escape sequence!!!)
Attach  ->  sudo docker attach mylamp


sudo docker rm container -> remove
sudo docker rmi image -> remove

sudo docker tag wp_group2 ajfernandez/wp_group2 -> generate a new image from image with new tag

sudo docker commit containerName newImageName
Networking
Info
docker inspect -f ' - ' $(docker ps -aq) -> all containers on host with their IP
docker inspect -f '' container_name_or_id
Setting-up
sudo docker network create --driver bridge jupiterNet --subnet=192.168.4.0/24 --gateway=192.168.4.1
sudo docker network create --driver bridge saturnNet --subnet=192.168.6.0/24 --gateway=192.168.6.1
Link
docker run -ti --rm --net=networName --name containerName
http://dondocker.com/como-hacer-redes-con-docker/
example binding this new networks to containers:
sudo docker run --network=jupiterNet -it --name webserv ajfernandez/lamp_base

sudo docker network ls

sudo docker network inspect jupiterNet
“Bridge” is the default network in docker, this come from scratch.
The following command will create a directory called nginxlogs in the user’s home directory and bindmount it to /var/log/nginx in the container:
docker run --name=nginx -d -v ~/nginxlogs:/var/log/nginx -p 5000:80 nginx
“ls” bash useful options
Sort files by modification date (descending order):
ls -lt
Sort the output of ls by any attribute:
ls --sort=size
Sort any of previous command or ls output in ascending way:
ls -r //flag -r (reverse)
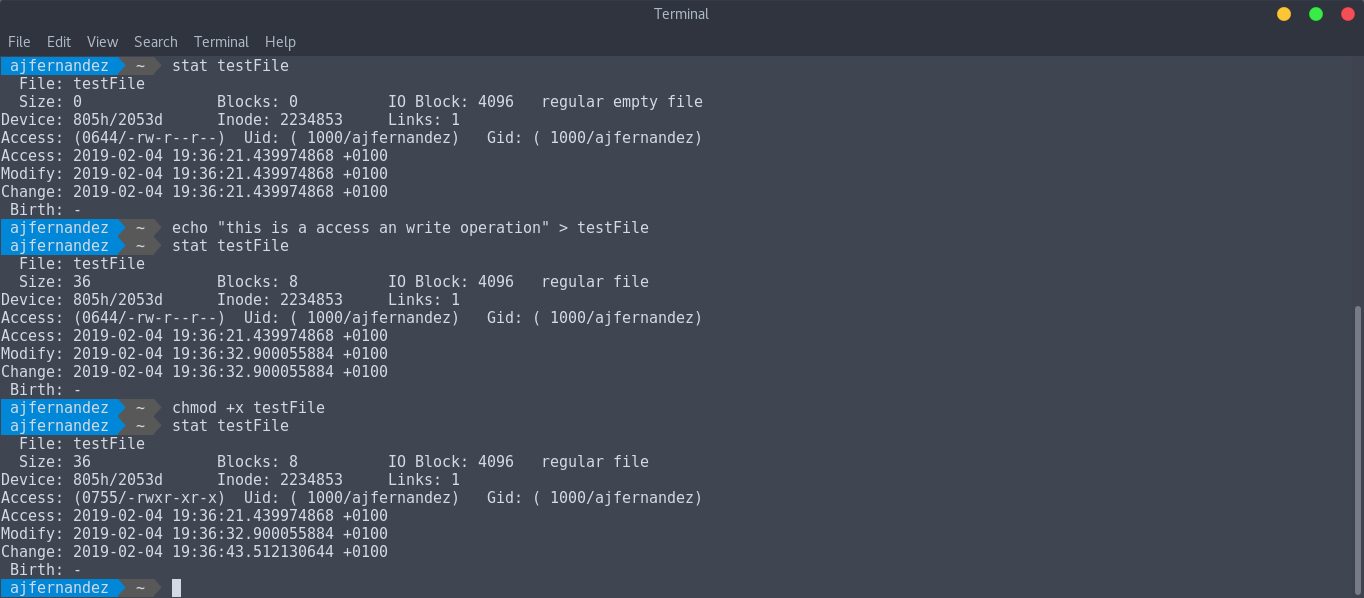
Displaying file or filsystem status -stat command-